
Instructions for assembling pipes
ASSEMBLY OF THE RUBBER GASKETS
Prior considerations
When selecting the type of joint, the following factors (among others) will be taken into account: the external and internal stresses, the rigidity of the support bed and the diameter of the pipes. In the connection points between pipes or between pipes and manholes, it must be ensured that:
- The capacity to bear the loads of the pipes is not affected.
- The pipe that must be connected must not exceed the interior surface of the pipe or manhole bell to which it is going to be connected.
- The joint must be watertight.
The types of gaskets used in reinforced concrete piping must comply with the specifications set out in standard UNE 127,010. The ASTM standards and some tender documents for public bodies also indicate additional specifications for rubber gaskets.
Assembly of the rubber gaskets
Sliding gaskets
The sliding gaskets are fitted in their final position resting on a tiered spigot or in a groove made in it. They seal the joint by compression and sliding thanks to a lubricant applied to the bell and spigot.
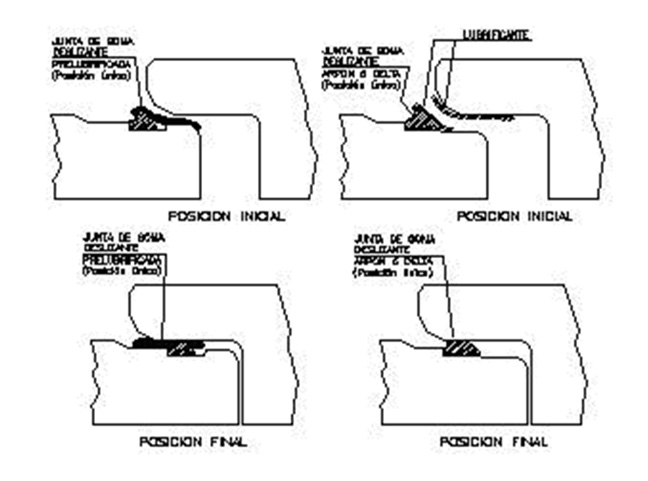
When fitting the sliding gaskets you must:
- Clean any foreign substances from the union surface of the bell.
- Lubricate the interior surface of the bell using a brush, sponge or gloves, covering the whole surface. Use suitable lubricant only.
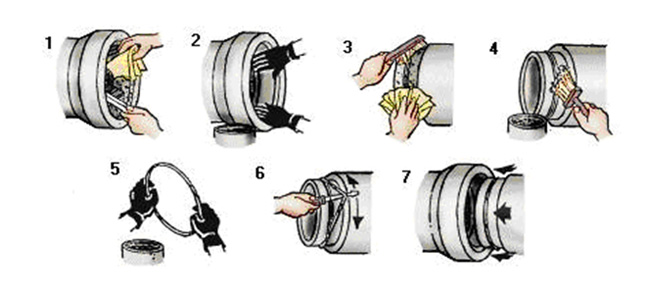
- Carefully clean the pipe spigot including the step or the groove for the gasket.
- Lubricate the pipe spigot, especially the area where the gasket will be fitted.
- Lubricate the gasket well in the spigot or bell.
- Fit the gasket carefully. Even out the tension of the rubber gasket by running a round, smooth object between the spigot and the gasket, all the way around the whole circumference several times.
- Concentrically align the bell and spigot of the pipes you are going to join. Check that the rubber gasket makes contact with the inner area of the bell all the way around its circumference.
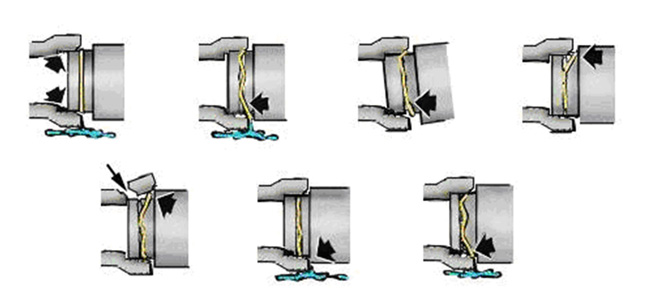
Rolling gaskets
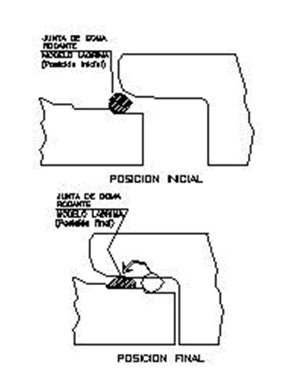 They are fitted on the edge of the spigot and the seal is the result of compression caused by its rotation, produced by a progressive reduction of annular space between the spigot and the bell. During the process of fitting the pipes together, lubrication is not recommended. The weakness of this type of gasket is that its requires meticulous approach and concentricity of the pipes. Going back is not possible because it comes off easily as it is placed on the edge of the spigot. Similarly, as it is not placed in its final position it can be installed unevenly in the spigot of the pipes, leaving some areas more compressed than others. For this reason this type of gasket is being replaced by sliding gaskets.
Precautions:
- A bell that is not properly lubricated can lead to the gasket being positioned on the step or coming out of groove causing excess compression that may damage the pipe and compromise the seal.
- A defective or blocked groove can prevent the gasket being seated correctly.
- To facilitate sliding, especially in hot weather, it is advisable to smear the gasket with lubricant when it has already been placed in the groove or on the step.
- If it is not well lubricated, excessive force will be required to position the pipe properly.
- Uneven pressure on the gasket can cause leakage or break the bell.
- Improper alignment can displace the gasket causing leakage or breaking the bell.
- Check the location of the rubber gasket using a shim. The rubber ring must be housed evenly throughout the whole circumference of the pipe, at the exterior distance indicated by the manufacturer in documentation for the joint system.
- Lubricants with a gel consistency must be used, and liquid soaps are contraindicated.
ASSEMBLING THE PIPES
All the concrete pipes must be assembled taking certain basic precautions:
 Check previously that the type and diameter of the rubber gaskets you are going to use correspond to the diameter of the pipe to install (the corresponding diameter should be printed on the gaskets).
- The male and female ends of the pipes and the gaskets must be free of any dirt, grease, soil, etc. Similarly, they must be in perfect condition; any deterioration detected must be repaired.
- You must fit the gasket in the position specified in the design of the joint.
For the joint to be correctly connected and watertight, the pipe you are adding must be suspended and concentric with the pipe that has already been installed. This decreases the installation stresses and the likelihood of damaging the pipe during the process. The parts of the pipes that will be in contact must be in perfect condition, clean, and dry if rolling gaskets are used or lubricated if sliding gaskets are used.
Pipes with small diameters can be suspended with the same equipment used for lowering them into the trench; handles or mechanical levers can be used to overcome the connection forces.
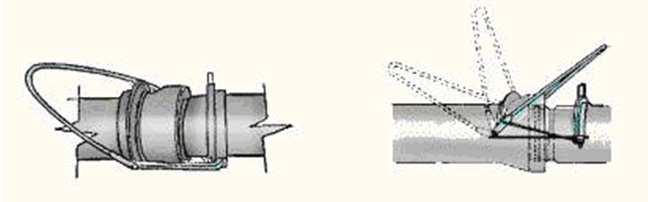
These tools, depending on the design of the piping or the diameter of the pipes, may be insufficient or incapable of producing enough force to overcome the resistance during the process of joining the pipes. This is why, generally, they are used for pipes with nominal diameters of 600 mm or less.
Other better tools for the installation of these pipes with small and medium diameters are hydraulic hoists, as they reach a greater power which generally enables them to connect pipes with nominal diameters of up to 600 mm.
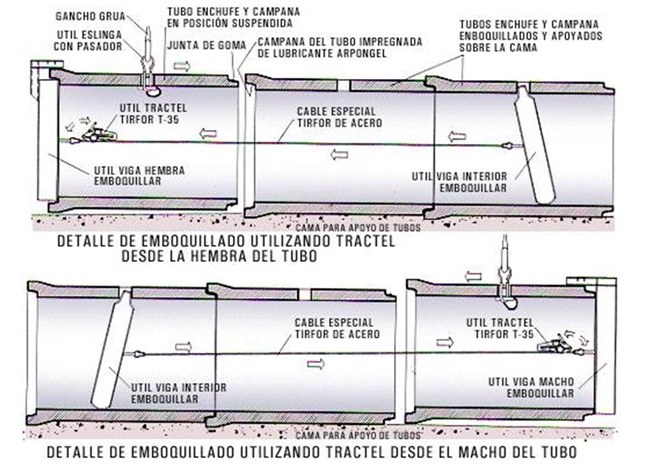
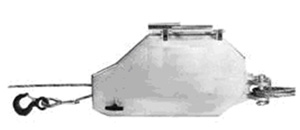 If you do not have access to these elements, these pipes have traditionally been assembled using winches (see Figure). The essential precaution that must be taken is that the traction does not deviate or impede the concentricity and alignment of the pipe.
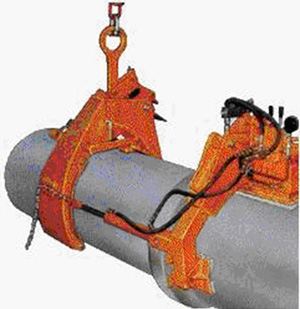
From nominal diameters of 800 mm, a pipe connector specially designed for assembling pipes with large diameters can be used.
This type of tool can be used to assemble pipes with nominal diameters of up to 3,000 mm, the maximum diameter set out in the standard UNE 127,010 for reinforced concrete piping.
Another system for assembling pipes with large diameters (nominal diameters from 800 to 3,000 mm) consists of including special hooks in the pipe during manufacture. These pipes are installed using installation chains secured to the hooks.
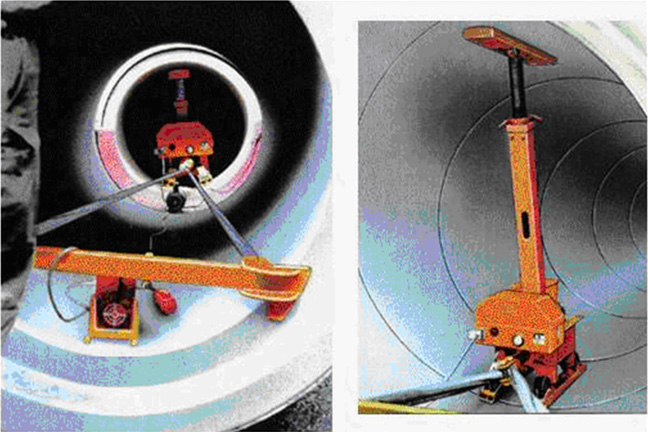
A real alternative to the above assembly methods for pipes with large diameters consists using of factory-drilled pipes. An anchoring bar connected to a winch is placed in this hole while the bar of the pipe that is going to be fitted keeps the pipe suspended for correct alignment (see figure).
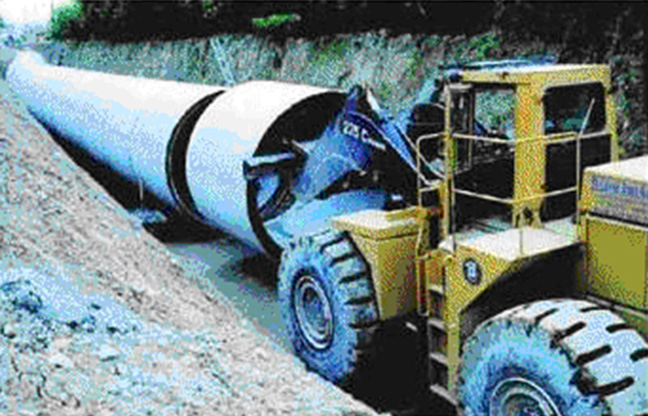
Finally, if there is a concrete floor, the pipes can be fitted using forklifts.
See figure

We use our own and third party cookies, for the analysis of user navigation. If you continue browsing, we consider that you accept the use.
You can change the settings or get more information here.

Arriandi auzoa, 1
48215 Iurreta (Bizkaia)
Tel.: +34 94... see telephone number
Fax: +34 94... see fax
Prefabricados Alberdi - Copyright 2012 | Legal notice | Data protection | Sitemap | Cookies


Website site designed 
and developed by DMacroweb